Editing on iPad for the First Time
- Apr 19, 2020
- 4 min read

After an eventful photography trip in Death Valley and the Eastern Sierras about a month ago, I found myself stuck away from home without my laptop and with many photos waiting to be processed. I only had my iPad with me because I prefer traveling light, and I don’t process my photos on the go anyway. I prefer to wait until I am back home in my cozy processing corner, on the big screen, with my favorite music blasting off and a warm cup of coffee on the side. But as I sat in my hotel room anxiously waiting to know when I can fly back home, my fingers were itching to process the photos I got in Death Valley and the countless other photos waiting in my backlog. So I decided to give Lightroom and Photoshop for iPad a try!
Before all this, I had only played with both Lightroom and Photoshop on my iPad, and I hadn‘t really processed any photo on my iPad before. So I picked a couple of photos that I thought could be processed entirely on iPad, given the existing limitations I already knew about in both iPad versions of Lightroom and Photoshop.
So here are the main techniques I used to achieve the results you’ll see at the end of this post.
Basic Global Adjustments in Lightroom for iPad
First off, we’ll start with Lightroom to make some basic global adjustments to the light, color, detail, etc.
Here are the adjustments I made and how to find these sliders in Lightroom for iPad:

(1) Click on the ”adjustments“ icon on the right
(2) Start opening each panel and make the adjustments you like with each slider
Here are the other basic global adjustments I made in the other panels:


Bonus: Selective Edits in Lightroom for iPad
Similar to Lightroom for Mac/PC, you can make some selective edits in Lightroom for iPad as well. For example, I used a gradient selective edit on this photo. Here is how to make a selective edit:

(1) Pick the “selective edits” panel on the right
(2) Tap on the (+) sign in the upper left corner
Then you’ll see the three types of selective edits you can make:
(1) brush selection, (2) radial selection, or (3) gradient selection

Pick the one that works best for your photo and where on the photo you want to apply it, then use the sliders in the panels on the right to make the adjustments on the selected area.
Localised Adjustments in Photoshop for iPad

Now to continue processing in Photoshop, we need to export the result we got from Lightroom into Photoshop in two simple steps:
1. From the share sheet in Lightroom, select “open in”:

2. Select “copy to Photoshop”:

Next, we are ready to start processing in Photoshop. I am going to share with you the three main techniques I used: The Orton Effect, Dodging & Burning, and Adding Glow.
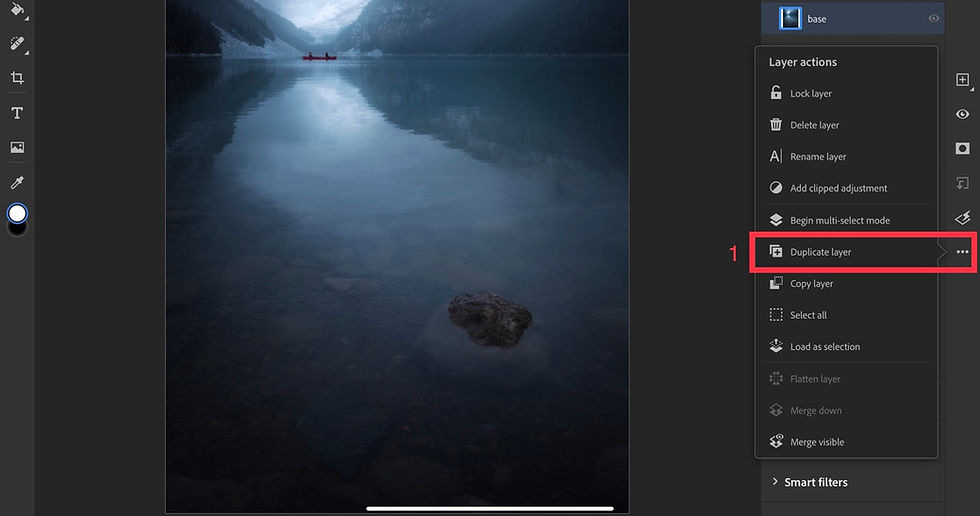
The Orton Effect:
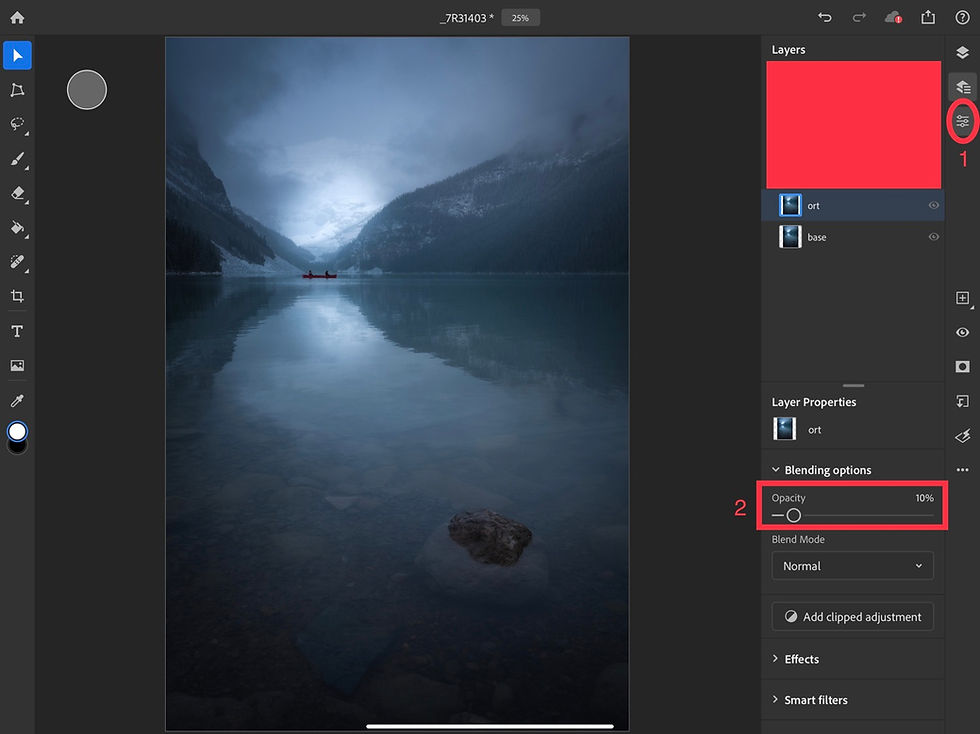
The first step is to (1) duplicate the base layer and then (2) apply the “gaussian blur” filter:

The rule of thumb for the “blur amount” is to be around the megapixels of the camera used. In my case, I used the Sony a7R III which has 42 megapixels:

Then reduce the opacity of the blur layer to around 10%:
Next, while the blur/Orton layer is selected, add a clipped “levels” adjustment layer:

Now adjust the: (1) lights, (2) midtones, and (3) darks points as shown:

I usually move the lights point (1) close to the middle, then bring the midtones point (2) close to the lights point (1), and finally, I move the darks point (3) just to touch the tail of the curve. Play with the three points until you reach the effect you like, and you can also play with the opacity of the blur/Orton layer to see how much of the effect you want, and that’s the Orton effect!
Dodging and Burning:
Dodging and burning techniques are used to guide the viewer‘s eyes through the photo by brightening the areas where you want the eyes to follow, and darkening the areas where you don’t want them to go. There are many ways to accomplish this, so here’s how I do it:

(1) Make a new blank layer on the right
(2) Change the blend mode to “soft light”
(3) Pick the “brush” tool on the left, and make sure it’s a soft brush
(4) Reduce the opacity of the brush to around 5-10%
(5) Select the black color for burning then start painting the areas you want to darken, repeat painting to darken more
For dodging, repeat the same steps but select the white color for the brush then paint the areas you want to brighten, repeat painting to brighten more:

Adding Glow:
To add a glowing effect on a bright area, follow the same steps as dodging/burning, but choose the “overlay” or “screen” blend mode for the layer. Then paint with a light opacity white brush the area where you want to add glow:

Bonus: More Adjustments + Layer Masks in Photoshop for iPad
There are other types of ”adjustment layers” available in Photoshop for iPad also, and to find them: (1) hold the ”new layer” button, then (2) select “adjustment layer”

You’ll find seven types of adjustment layers. Play with each one to see how they affect your photo, then decide which ones work for you:

Finally, you can add a “mask” to each layer to control where you want the effect to be. The white area in the mask is where the effect is applied, the black area is where the effect is hidden, and the grey area is where the effect is partially applied. To add a mask on a layer, tap the mask icon on the right:

Next, to make changes in the mask: (1) tap on the mask once to select it, then (2) paint the desired areas with a white or black brush to show or hide the effect of that layer

Double click on the layer mask to show the painted mask:

And that’s about it! Those were all the tools and techniques in Lightroom and Photoshop for iPad that I used to achieve the below results. You can apply the same techniques in Lightroom and Photoshop for Mac/Windows with even more control of course.
The Results


Let me know what you think of the techniques and results! Feel free to ask me any questions in the comments below and I will be happy to help. I am going to continue experimenting with both Lightroom and Photoshop for iPad since I am still locked out here, and I will report back if I find more useful techniques. Happy editing and stay safe!